It's one thing to test the connectivity of a cable that's coiled up in front of you, but it can be a whole different story when the cable that needs testing begins in one room and ends in another! That's where remote testing comes in … whether you need to troubleshoot transmission problems in existing LAN cabling or test the connective qualities of new network cables, a remote testing module — combined with this simple technique — can help you get through your task quickly and easily.
PROJECT CHECKLIST
|
|---|
| Experience Level: Intermediate |
| Time Required: 1-5 Minutes per cable |
| Steps: 2 |
| Supplies: LAN cable tester with remote module; an extra person to help with reading the remote unit (optional) |

STEP 1
Holding the LAN tester so that its indicator surface is facing you and its back is resting in the palm of your hand, plug one end of the RJ45–terminated cable into the main device.
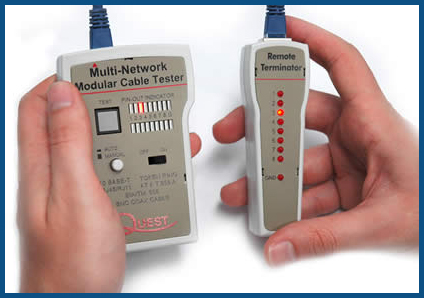
STEP 2
Plug the other end of the cable into the remote testing device.
Run the test sequence as usual from the main testing unit; this can be done in either manual or automatic mode. Since the testing is being done remotely, you will see only one row of indicators illuminate on the main unit; these will correspond to the row of indicator lights on the remote unit.
Compare indicator lights on the main and remote test units. At this point, it may really help to have another person around to read the indicators on the remote unit. However, if you're doing the job alone, you can run the test manually, going back and forth between test units to check that each wire functions at both ends. As with non-remote testing, with an illuminated tester, an optimum connection is shown when both of a wire's indicators are brightly lit; a dim light equals poor connection, and no light indicates failure to connect.
Shop at CableOrganizer® here for remote LAN testers.


