Cable Management for Server Racks
By: CableOrganizer®

Every installer wants to save time and make the installation of electronics systems as easy as possible. Having a system that is simple and quick to service and upgrade, benefits both the installer and customer. When care is given to the management and maintenance of cable entering the rack or enclosure system, the goals of providing customers with neat, organized and effective system are easily attained.
Today’s electronic systems’ wiring includes voice, data, video, audio, security and control. The facilities and wiring systems must be planned in an integrated manner because all these different wires make their way into racks of equipment.
Managing these cables creates some interesting challenges, as wire bend radius and fastening must meet industry standards, even inside the rack. With video going over twisted pair — and digital audio transmitted through CAT-5e / CAT-6 — it is apparent that audio/video systems integrators should be familiar with the associated standards. Additionally, more devices are being controlled and monitored via Ethernet nodes.
The TIA (Telecommunications Industries Association®) telecommunication wiring standards are used to ensure performance. These standards provide guidelines that reduce long-term building operation costs, lead to better infrastructure and are adaptable to changes. TIA-569, for example, relates to commercial building standards for telecommunication pathways and spaces. TIA-570 covers residential wiring standards.
HOT TIP: Installation of cabling systems during building construction or renovation is significantly less expensive and disruptive than after the building is occupied. It is important to convince a client that the small cost associated with running extra wires for future expansion will save them money down the road. Abandoned cables must be removed or tagged “For Future Use,” according to the NEC (National Electrical Code).
FIVE DISTINCT AREAS OF CABLE MANAGEMENT
- Horizontal cabling
- Backbone cabling
- Telecommunications rooms
- Equipment rooms
- Equipment racks
Note: These cables can be unshielded twisted-pair (UTP), shielded twisted pair (STP or” screened” cable) or coax, to name a few.
BEWARE OF THE BEND AND OTHER THINGS TO AVOID
- Cable twists
- Staples
- Tight cable ties
- Small bend radii
- More than 25 pounds. of pull force
Note: All twisted pair cable is manufactured as “loose-fill”, meaning there has to be a slight airspace inside the sheathing. This reduces mutual capacitance and data packet error rates. Things like tight cable ties will increase data errors. If cable ties are placed at even increments in a high-density installation using coax, it can cause standing waves.
NEXT loss (an acronym for “near-end crosstalk”) is also a problem. It is eliminated with proper terminating procedures. The twist in a pair must remain right up the connector. Too often, people un-twist the cable for an inch to aid in termination, which violates the standards. NEXT is tested and measured with a swept frequency through a “disturbing pair.” Optical fiber cabling standards are increasingly becoming a factor, as more and more data are passed through fiber in buildings and racks.
METHODS OF BRINGING CABLE INTO AN ENCLOSURE OR RACK SYSTEM
CABLE ENTRY: FROM ABOVE THROUGH TOP OF RACK
Select enclosures that come standard with wide-open tops for large cable bundles. When adding a top option, select one that includes a removable panel for service convenience.
Top options are available that can accept a 6-inch, 9-inch or 12-inch wide cable tray or cable ladder. The opening in the top also allows for the use of a cable drop on the cable ladder to maintain proper bend radius of the cable.
HOT TIP: The easy-to-machine aluminum panel in many rack tops can also be field punched to accept multiple sizes of conduit.
CABLE ENTRY: FROM BELOW THROUGH BOTTOM OF RACK
Enclosure bases often feature an open design to accept large cable bundles from below. There are about 3 inches of space in the bottom of the enclosure before reaching the rack space area, which allows for cable entry up into the enclosure. Enclosures with a unique “up-formed base” provide interior room for cable management and coiling unused wire. There are multiple sizes of EKO in the rear of many enclosures for piping in conduit.
Riser bases provide enclosures with an additional 2.5 inches of clearance off the floor, which can be used for cabling below each enclosure — or cabling from one to another when ganged. Laser knockouts on the ends of many riser bases simplify cable pass-through when they are ganged together.
Floor Installations (Non-Raised Floor)
- Install rises bases
- Knock out cable pass through to route cable between riser bases and into racks
- Install racks on riser bases
When the riser bases are used with feet and angles, it allows the installer to firmly attach enclosures to the sub-floor in Raised Floor /Access Floor applications.
DRESSING CABLE INTERNALLY
Segregation of cables inside the rack is important. NEVER run AC or speaker cables parallel within proximity to signal wires (within 2 inches). Speaker wires can act as AC cables in high-power situations. The same care should be taken in keeping signal wires away from close parallel runs. Speaker and AC wires can, however, be run in closer proximity.
Bend radius for twisted-pair cables is standardized at 1.5 inches (3-inch diameter). This needs to be taken into consideration during the internal wiring layout of the rack. Coax cables should not be kinked, although they are more tolerant than high-speed data to tighter bends.
HOT TIP: Bundling AC cables is a violation of the NEC, although this is rarely caught by an inspector.
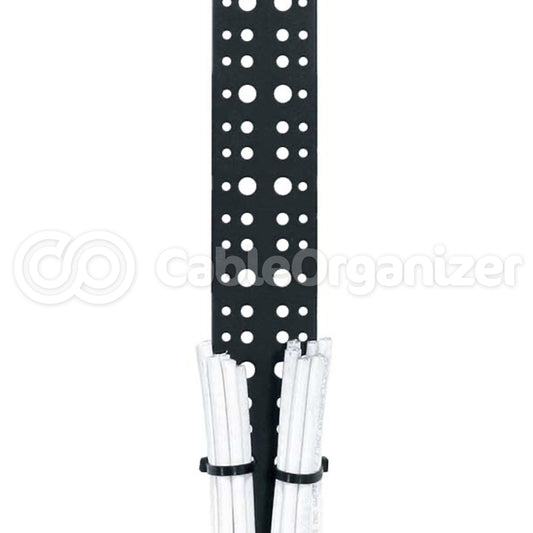
VERTICAL LACER STRIPS
Add as many lacer strips as necessary to route the maximum amount of cable into the enclosure while keeping power and signal cables separate. Vertical lacer strips mount to enclosure rail brackets and allow the installer to lace cable from the top to the bottom of a rack, or vice-versa. They are available in different widths, from 1-inch to 4.75-inches.
Vertical lacer strips provide several ways to dress cable. Some strips are punched with holes for mounting cable ties saddles. Tie saddles have been designed to hold bundles wrapped with cable ties or hook-and-loop straps (such as VELCRO® Brand ONE-WRAP® Wire Wrap) up to .75 inches wide.
Some lacer strips include raised lances that accept wire ties or hook-and-loop straps without the need for tie saddle accessories. The most advanced lacer strip will feature holes for mounting vertical power strips, cage nut-mounted and tie saddles. These full-featured lacer strips also include pre-cut tie posts. Assembled cable bundles mount easily to these tie posts; installers slide the cable tie or hook-and-loop strap onto the tie post without the hassle of fishing it through the lacer strip before wrapping the bundle.
HOT TIP: Lacer strips with tie posts allow assembled cable bundles to be mounted easily.
Effective vertical cable management can be accomplished in many ways, but different regions have adopted unique styles. Integrators along the East Coast of the United States who work in a high-density environment prefer the “tie and slide” technique. This allows smaller cable bundles to be dressed vertically, mounted loosely to the pre-welded horizontal tubes found in some enclosures and then slid in place alongside mounted equipment. By utilizing this space (“no-man’s land”), installers greatly increase the amount of useable area within an enclosure. West Coast integrators mostly prefer using individual, which is vertical lacers with tie saddles. Both examples provide an effective cable management solution. Individual enclosures and layouts will dictate the best method for each installation.
When large (4-inch diameter) cable bundles are used, a rack with broad, flanged rack rail should be chosen. The large flanges provide the needed space to dress large bundles without fishing wires behind rail brackets.
HORIZONTAL LACER STRIPS
Most enclosures are furnished with a set of rear rackrail that can be used to mount horizontal lacer bars at any height position. These lacer bars will address two common problems that occur: cable strain relief and running cables from one side of the rack to the other.
Different style lacer bars are available for varied applications. There are round stock lacer bars, flat stock and “L” shaped with cable tie slots. They also come with different size offsets such as 1.5 inches, 2 inches, 4 inches and 6 inches. Determine which lacer bar is appropriate for the application.
OFFSET LACER BARS
Use offset lacer bars when:
- Positioning lacer bar close to the rear of the unit for cable strain relief
- Managing multiple horizontal cable bundles at different depth positions
- Cable labels need to be seen (offset away from patch field or unit)
TELESCOPING LACER BARS
A telescoping lacer bar system is the most advanced horizontal cable management solution. The limitless number of mounting options and configurations allows the installer for complete customizations. Telescoping lacer bars can be mounted to eliminate cable strain. This is done in combination with vertical lacer strips to meet the cabling needs of even the most high-density installation. Cables can be dressed throughout an enclosure using cable ties or hook-and-loop straps. Additionally, telescoping lacer bars feature mounting holes to accommodate vertical lacer strips and the mounting brackets for vertical power strips.
Horizontal telescoping lacer bars adjust to fit enclosure widths from 19 inches to 30 inches. The lacer bar can be mounted vertically or horizontally as a cable tray to reduce cable strain. The horizontal telescoping lacer bar can be mounted to rack rail brackets or to the inside flange of the rackrail itself. The hold pattern is such that an installer may also mount the lacer bar directly to opposing vertical lacer strips.
Front to rear telescoping lacer bars feature slots for cable ties or hook-and-loop straps. The slot patterns have been created to help manage cable bundles that run vertically or parallel to the floor. These lacer bars are available in several fixed and adjustable lengths. Depending on the model, the front to rear telescoping lacer bar can mount to the front and rear rackrail of enclosures from 14.5 inches to 50 inches deep. The hole patterns of front to rear telescoping lacer bars accept mounting of vertical lacer strips; and the mounting brackets for vertical power strips. The hole patterns have also been sized to accept the mounting of horizontal telescoping lacer bars, for the creation of a complete, versatile cable management solution.
The complete telescoping lacer bar system incorporates vertical lacer strips, vertical power strips, horizontal cable management and vertical cable management. Cables are protected from cable strain and dressed according to the proper bend radius. The telescoping lacer bars adjust to fit the depth and width of the host enclosure. The telescoping lacer bars adjust to fit the depth and width of the host enclosure. The complete, configured system is the most effective and comprehensive solution for dressing cables within an enclosure.
HORIZONTAL CABLING TIPS AND TRICKS
Feed from both sides when cable radius is large
- Use offset bars to get close to the rear of equipment without adding rackrail
- Leave room for cable labels
Note: Neat and tidy is always best.
INDUSTRY REQUIREMENTS
Different cables and signals have distinct requirements. The data market has high densities and is bend-radius sensitive. Video broadcast has a large quantity of coax cables. Security installations now have DVRs (Digital Video Recorders) where camera cables do not run to switcher. The DVR provides that function which means many cables need to be dressed directly to the equipment. Audio with its sensitive gain structure needs special care for hum and buzz. By following standards and common-sense rules, today’s complicated rack integration can look good and work well, thanks to proper cable management.
CABLE MANAGEMENT ACCESSORIES
Tie saddles are the easiest way to manage cable ties. Completed cable bundles can be hooked directly onto the tie saddles. By eliminating the need to fish cable ties through small holes or around lacer bars, tie saddles reduce installation time. Additionally, a robust tie saddle will accommodate hook-and-loop straps up to 4.75 inches wide. Tie saddles can be mounted to rail brackets, rackrail, telescoping lacer bars and some vertical lacer strips.
Hook-and-loop cable fasteners should be used when installing cable that is sensitive to strain or when the wrap is so tight that a cable tie would affect the performance of the cable. This problem is common when installing CAT5e or CAT6 cables.
Hook-and-loop straps can be opened and reused, making it easy to modify an installation in the future. If cable will be added or removed from a bundle, hook-and-loop straps should be used instead of cable ties. Cable ties must be cut, thrown away and replaced whenever cable bundles are modified.
HOT TIP: To properly install a hook-and-loop cable strap, first wrap it around a single cable and pass it through the loop on the end of the strap. Wrap the remainder of the cable bundle and close the strap.
Cable friendly rack screws are 0.375 inches long with a flat point. Because these 10-32 threaded screws do not extend far beyond the rackrail, they minimize the chance of cables chafing or being damaged by sharper, longer hardware. When dressing cables up against the inside of rackrail, these cable friendly screws are the best way to prevent accidental cable damage.
DRESSING CABLE INTERNALLY
In racks where a high density of cables is anticipated, it is often helpful to cut cable and bundle for testing what bend radius is possible. Many times, integrators find out too late that the cables simply cannot be effectively run. Prior testing on a bench allows better planning.